
|
|
 |
|
|
|
Welcome to the Australian Ford Forums forum. You are currently viewing our boards as a guest which gives you limited access to view most discussions and inserts advertising. By joining our free community you will have access to post topics, communicate privately with other members, respond to polls, upload content and access many other special features without post based advertising banners. Registration is simple and absolutely free so please, join our community today! If you have any problems with the registration process or your account login, please contact us. Please Note: All new registrations go through a manual approval queue to keep spammers out. This is checked twice each day so there will be a delay before your registration is activated. |
|
|||||||
 |
|
|
Thread Tools | Display Modes |
|
|
|
|
#1 | ||
|
Regular Member
Join Date: Apr 2010
Posts: 44
|
hey guys ive got an oil leak at the front of the engine. there is an electrical connector that plugs right in the middle of the engine up the front what is this? looks like it might be coming from there. any other ideas what might leak there as its really hard to see with all the pulleys in the way.
cheers guys au 2 falcon ute |
||
|
|

|
|
|
#3 | ||
|
Regular Member
Join Date: Apr 2010
Posts: 44
|
thanks i just degreased it and let it run for bout 10 mins and it seems to be coming from the bottom bolt that holds the power steering pump to the block. think ill have to pull it out and put some sealant on the bolt.
|
||
|
|

|
| This user likes this post: |
|
|
#4 | |||
|
AU DIE HARD
  Join Date: Nov 2005
Location: Between 2nd and 5th gear
Posts: 5,073
|
More likely it's coming from the timing chain tensioner ,which is in behind the power steer pump bracket , fairly common that they work loose I willl see if I can find a thread on them

__________________
........Age and treachery will ALWAYS overcome youth and skill....... CORTINA 250 2V POWER soon to be AUXR8 Windsor pwrd .............WINDSOR WARLORD WHO CARRIES THE CLEVO MAFIA AND BROKEN BOSSES... .........................  ......................... .........................Quote:
|
|||
|
|

|
| This user likes this post: |
|
|
#5 | ||
|
AU DIE HARD
  Join Date: Nov 2005
Location: Between 2nd and 5th gear
Posts: 5,073
|
there"s a picky of the culprit
 you can tighten it with out removing it if you get all the brackets out of the road you can tighten it with out removing it if you get all the brackets out of the roadhttp://www.fordforums.com.au/showpos...39&postcount=8 |
||
|
|

|
|
|
#6 | |||
|
Regular Member
Join Date: Mar 2010
Location: Country Vic.
Posts: 474
|
Quote:
|
|||
|
|

|
|
|
#7 | ||
|
Regular Member
Join Date: Apr 2010
Posts: 44
|
thanks mate will have a look tomora.
|
||
|
|

|
|
|
#8 | ||
|
Regular Member
Join Date: Aug 2007
Posts: 108
|
I had this too, was just loose, easy fix..
|
||
|
|

|
|
|
#9 | ||
|
Starter Motor
Join Date: Jul 2006
Posts: 4
|
Also had this recently on a S1 Futura. Thanks to the link posted, showed me what needed to be done to fix it. Bit of a pain to get to but fixed it in the end.
|
||
|
|

|
|
|
#10 | ||
|
Moderator
  Join Date: Feb 2005
Location: Kenthurst
Posts: 40,403
|
Had the same .. except mine didn't tighten ... so had it replaced.
No more leak (god it leaked though)
__________________
The Current Stable 2016 SZII TS Territory RWD Petrol The Evolution of the EGA54D utes AU Workshop Build thread of EGA54D B-Series Workshop Build thread of EGA54D 2004 SX TX Territory AWD - Gone but not forgotten 2010 FG XT "The ex-rental" - Moved onto a new home Mechan1k's Flickr Page |
||
|
|

|
|
|
#11 | ||
|
Next upgraded Mk1 Leopard
 Join Date: Jan 2005
Location: Sydney, in the burbs
Posts: 4,913
|
I did mine today, what a stupid place to put it. Took lots of pic's will post a 'how to' later.
UK
__________________
Plastic Surgery 1 AUII Monsoon Blue How 2's: Change rear view mirror, Install backfire valve, Change foam front seats, Install auto transmission cooler, Replace Trans Shift Globe, Remove front door Trim, Paint AU headlights, install door spears, Premium Rear Parcel Shelf, go here...
 |
||
|
|

|
|
|
#12 | ||
|
Regular Member
Join Date: Aug 2007
Location: Parramatta, SYD
Posts: 378
|
that would be great
__________________
Many Thanks 2001 AUII Factory LPG Manual XL Styleside Box High series bonnet Clear Side Indicator K&N Air Filter BAXR6T Snorkle Low Fronts, Super Low Leafs |
||
|
|

|
|
|
#13 | |||
|
AU DIE HARD
  Join Date: Nov 2005
Location: Between 2nd and 5th gear
Posts: 5,073
|
UK fairly sure there is a how to already there someware thats how I fixed th SR
I
__________________
........Age and treachery will ALWAYS overcome youth and skill....... CORTINA 250 2V POWER soon to be AUXR8 Windsor pwrd .............WINDSOR WARLORD WHO CARRIES THE CLEVO MAFIA AND BROKEN BOSSES... .........................  ......................... .........................Quote:
|
|||
|
|

|
|
|
#14 | |||
|
Regular Member
Join Date: Aug 2007
Location: Parramatta, SYD
Posts: 378
|
Quote:
__________________
Many Thanks 2001 AUII Factory LPG Manual XL Styleside Box High series bonnet Clear Side Indicator K&N Air Filter BAXR6T Snorkle Low Fronts, Super Low Leafs |
|||
|
|

|
|
|
#15 | ||
|
Next upgraded Mk1 Leopard
 Join Date: Jan 2005
Location: Sydney, in the burbs
Posts: 4,913
|
Whoosha I wrote this up anyway UK
 Like many others I had a small leak around the fan belt coming from the Timing cover seal. So another How to: fix trimming chain plug leak. HOWEVER....before you start... It should be possible to just tighten the Timing cover seal without taking anything off. Access would be very ‘blind’ but if you have a socket set, try accessing from this angle. Of course you can’t check the seal, only tighten the bolt.  So to do it the long way... Tools required, socket set 10-20, ring and open end spanners 10-20, extension bar, crow bar, gasket goo, degrease, string, an old towel, 1 Phillip's head and straight screw driver 1. Park the car wear you can degrease as you work. Remove the fan belt cover if you have one  2. Remove air intake, put the 2 screws ‘somewhere safe’ 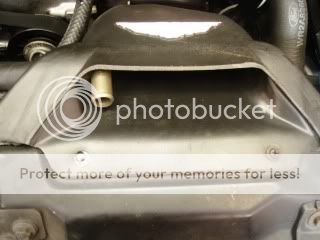 3. With the fan belt now exposed, use the crow bar to release pressure off the belt ready to slide it of the Power steering pulley. N.B. I used a long piece of wood, this worked to get the belt of but the wood had snapped by the time I went to put it back on. The crow bar was much safer/easier.  With the tension off, use the screw driver to slide the belt of the pulleys. 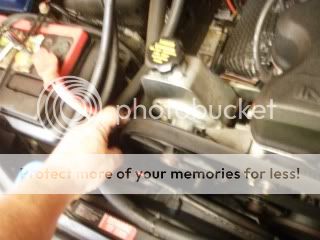 4. Tie the belt to the pipes over the radiator. This will save a bit of work re threading later.  5. With the fan belt off, time to remove the Power Steering reservoir. 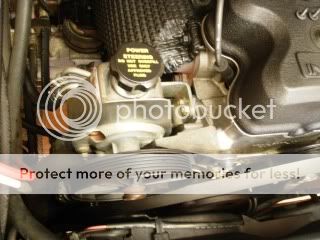 6. There are several bolts and 1 nut to remove to take of the Power Steering reservoir. Remove the single nut. 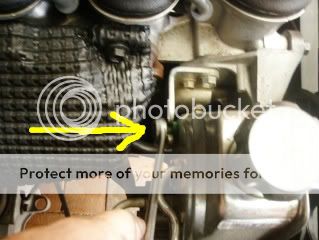 7. Now remove the 3 blots at the front of the Power Steering pump. You will need to access 2 bots through the pulley wheel. 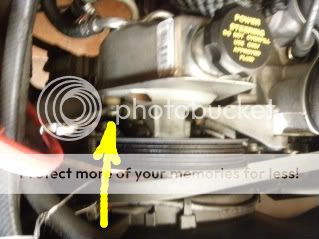 and 2 bolts (1 high 1 low) and 2 bolts (1 high 1 low) You can now gently lift of the Power Steering pump. I placed mine just back near the coolant reservoir. With the Power Steering pump off you can access the holding bracket. 8. Next remove the 4 blots located here. I used a ring spanner (they weren’t to tight) and a tube. (As you can see the pump is still on. I have changed the order to make it easier to do) 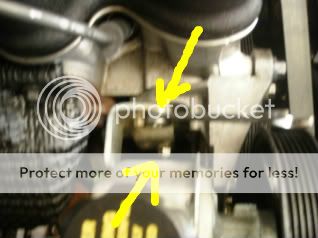 and and  and and 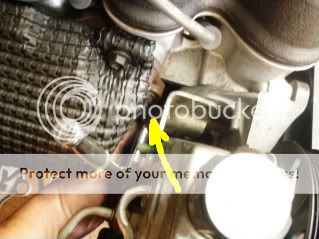 9. Next, remove the 3 blots located at the front. The fan belt will get in the way, just push it down. 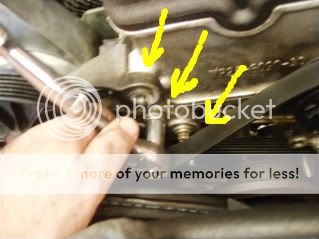 There is still 1 bolt holding the bracket to the engine block. Undo and remove the bracket. It will need a clean with degrease.  10. You can now see the Timing cover seal blot. Mine had oil and dirt all around. Use an old towel to clean up the mess before unbolting. 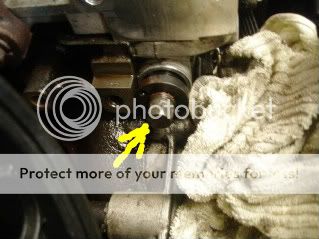 Leave the towel there as some oil will leak out when you remove the bolt. Also have the gasket goo handy ready for the next step. 11. Get a ring spanner and undo the Timing cover seal blot. 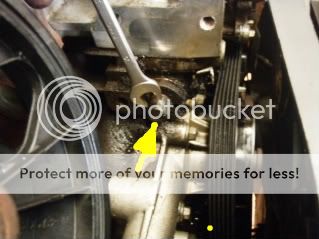 (I took this pic before I put the towel down, have the towel here to stop oil leaking) 12. Remove the Timing cover seal and clean it and the engine block. Check the ring washer. Mine looked OK so I simply put some gasket goo on the seal and screwed it back in. I cleaned the area again with the old towel to remove any oil that had leaked out. (image from Whoosha) 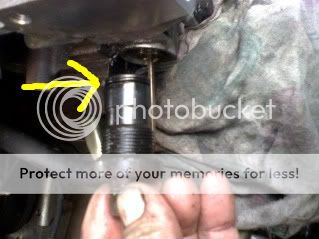 13. Apply a bead of gasket goo and screw it back in half way. Clean the shaft of oil and check the gasket goo. If OK tighten up. To make a tight fit and seal I used a spark plug tube for extra leverage when tightening the seal back on. 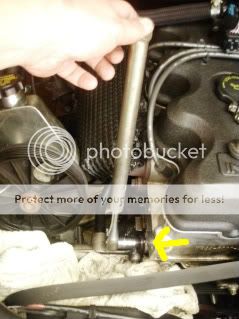 14. Clean up again if you have to run your finger around the area to smooth out excess gasket goo. Now is a good time to spray on some degrease in the area, let it penetrate (and the gasket goo to dry a bit) and have a cup of tea, smoke, beer etc. When the gasket goo feels OK wash of the degrease before reassembling. 15. The reassembling is just the reverse of the above, but take the opportunity to give everything a clean. Hopefully all the bolts you put somewhere same are still there. 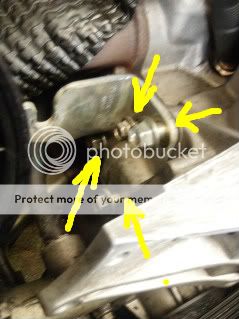 16. Loosely put the Power steering pump back on as it will help putting on the fan belt. Putting the fan belt back on was a pain until I used the crow bar. Wedge it in here as Whoosha shows here. 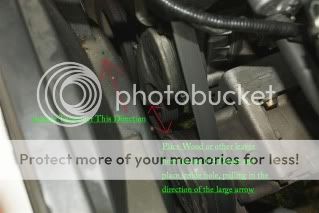 17. With the Power steering pump and fan belt back on replace the air intake and fan belt cover and you are done. Fire up the car and check everything is OK, with any luck no more leaks. As far as I know this is the same for Series I, II and III Au's. Allow say half a day to do it, better done with good light. Its a greasy job so have hand cleaner close by. Good luck  I think it was worth the effort. I think it was worth the effort.UK
__________________
Plastic Surgery 1 AUII Monsoon Blue How 2's: Change rear view mirror, Install backfire valve, Change foam front seats, Install auto transmission cooler, Replace Trans Shift Globe, Remove front door Trim, Paint AU headlights, install door spears, Premium Rear Parcel Shelf, go here...
 |
||
|
|

|
|
|
#16 | ||
|
Donating Member
 Join Date: Aug 2006
Posts: 5,142
|
I will look more deeper into this, as it may be the cause of the presence of oil on the front of my engine. Cheers for the coincidence

|
||
|
|

|
|
|
#17 | ||
|
Regular Member
Join Date: Aug 2007
Location: Parramatta, SYD
Posts: 378
|
love your work ty
__________________
Many Thanks 2001 AUII Factory LPG Manual XL Styleside Box High series bonnet Clear Side Indicator K&N Air Filter BAXR6T Snorkle Low Fronts, Super Low Leafs |
||
|
|

|
|
|
#18 | |||
|
AU DIE HARD
  Join Date: Nov 2005
Location: Between 2nd and 5th gear
Posts: 5,073
|
Nice work as always UK

__________________
........Age and treachery will ALWAYS overcome youth and skill....... CORTINA 250 2V POWER soon to be AUXR8 Windsor pwrd .............WINDSOR WARLORD WHO CARRIES THE CLEVO MAFIA AND BROKEN BOSSES... .........................  ......................... .........................Quote:
|
|||
|
|

|
|
|
#19 | |||
|
Next upgraded Mk1 Leopard
 Join Date: Jan 2005
Location: Sydney, in the burbs
Posts: 4,913
|
Quote:
http://www.fordforums.com.au/showpos...39&postcount=8 only cleaned it, then slide it back in. I did not adjust anything. Is that OK? The car has been running for week and no problems re leaks or engine timmming. UK
__________________
Plastic Surgery 1 AUII Monsoon Blue How 2's: Change rear view mirror, Install backfire valve, Change foam front seats, Install auto transmission cooler, Replace Trans Shift Globe, Remove front door Trim, Paint AU headlights, install door spears, Premium Rear Parcel Shelf, go here...
 |
|||
|
|

|
|
|
#20 | |||
|
AU DIE HARD
  Join Date: Nov 2005
Location: Between 2nd and 5th gear
Posts: 5,073
|
If you only took the plug out ,cleaned and resealed it back in thats fine . the actual tensioner adjuster part screws in and out with Allen keys and has settings ext. the one I did fell out with the plug
 but was a easy fix. still haven found the how to I used at the time, it may have gone into cyber space when we had the Melt down a while back .. I will paste the link up in the How to section for you when I get 10 min. to spare, and you can forward my 5% cut for the hand shot to my account but was a easy fix. still haven found the how to I used at the time, it may have gone into cyber space when we had the Melt down a while back .. I will paste the link up in the How to section for you when I get 10 min. to spare, and you can forward my 5% cut for the hand shot to my account 
__________________
........Age and treachery will ALWAYS overcome youth and skill....... CORTINA 250 2V POWER soon to be AUXR8 Windsor pwrd .............WINDSOR WARLORD WHO CARRIES THE CLEVO MAFIA AND BROKEN BOSSES... .........................  ......................... .........................Quote:
|
|||
|
|

|
|
|
#21 | |||
|
Next upgraded Mk1 Leopard
 Join Date: Jan 2005
Location: Sydney, in the burbs
Posts: 4,913
|
Quote:
I will change the 'how to' top reflect this. I think it would be OK if the tensioner was not fully removed, just undone a bit, put on gasget goo, re-tighten that would be fine. I am sending the how in a word doc to Russell. UK
__________________
Plastic Surgery 1 AUII Monsoon Blue How 2's: Change rear view mirror, Install backfire valve, Change foam front seats, Install auto transmission cooler, Replace Trans Shift Globe, Remove front door Trim, Paint AU headlights, install door spears, Premium Rear Parcel Shelf, go here...
 |
|||
|
|

|
|
|
#22 | |||
|
Regular Member
Join Date: Dec 2008
Location: Sydney
Posts: 128
|
Quote:
It's just sitting there loose...  Do I just thread the plug back in onto it or do I need to screw this back in first?.. Help! lol |
|||
|
|

|
|
|
#23 | ||
|
I'd rather be cycling
Join Date: Oct 2011
Location: in a house
Posts: 10
|
Newbie on this forum, sorry if this has been covered before.
I don't mean to be unduly argumentative, BUT, I just found the source of an odd oil leak on my AU-II with 230,000km (I've had it since buying it as a demonstrator in 2000). The leak seemed to be from the timing cover, but once I got the PS pump and mounting bracket off, that area all looked pretty clean. My leak was associated with the lowest mounting bolt for the PS Pump mounting bracket. That bolt is smaller than the other two - a 10mm head and about 4" long. The hole in the bracket and the block are the same size as for the other (larger) mounting bolts, so there is lots of space for oil to leak out. You can see the amount of oil that's come out onto the white tissue underneath the bolt, and some of the spray on the engine itself.  I don't know if there was originally a seal or a sleeve installed in the block, but if there was it's not there now. I loaded some (6) O-rings onto the bolt (which has a step-down in the shaft diameter about 12mm from the head).  I got these O-rings from a champion assortment (blister pack) available from your favourite auto store. Bought two sets and loaded two sets of O-rings in the following sizes and order - first on was the 3/16", then the 7/32" and finally the 1/4". You can see that the rings protrude beyond the mounting bracket and will extend into the engine when the whole lot is assembled again. It all seems to seal now, and no evidence of leaks so far. I did wonder if this is leaking because the crankcase pressure is higher than normal, perhaps a broken PC valve? Last edited by mccoy54wru; 16-10-2011 at 02:24 PM. Reason: trying to get images to show in-line |
||
|
|

|
| 5 users like this post: |
|
|
#24 | ||
|
Next upgraded Mk1 Leopard
 Join Date: Jan 2005
Location: Sydney, in the burbs
Posts: 4,913
|
That is a very long bolt isn't! Good idea.
UK
__________________
Plastic Surgery 1 AUII Monsoon Blue How 2's: Change rear view mirror, Install backfire valve, Change foam front seats, Install auto transmission cooler, Replace Trans Shift Globe, Remove front door Trim, Paint AU headlights, install door spears, Premium Rear Parcel Shelf, go here...
 |
||
|
|

|
|
|
#25 | ||
|
Starter Motor
Join Date: Aug 2013
Posts: 2
|
Hi guys, l followed the advice of Uncle Ken and fixed the massive oil leak l had with my AU falcon wagon. No more leak, but l have a hell of clean up to do. I did have a moment of panic when the timing chain tensioner spring and adjuster came out. I managed to fit back in ok, and no problems. Everything is running smoothly. The best advice l have followed. Thanks to all.

|
||
|
|

|
| This user likes this post: |
|
|
#26 | ||
|
Regular Member
Join Date: Mar 2010
Location: Country Vic.
Posts: 474
|
Nice write up mccoy54wru, My AU II had the exact same problem as yours. My mechanic just gooped it up and its been fine ever since. I like your fix better tho...
|
||
|
|

|
|
|
#27 | ||
|
WEST australia
Join Date: May 2011
Posts: 110
|
my bf is leaking aswell just wandering if it would be similar fix like this??
__________________
 |
||
|
|

|
|
|
#28 | ||
|
FF.Com.Au Hardcore
Join Date: Jun 2005
Posts: 588
|
Related note, when I was changing the belt tensioner pulleys, which required removing the tensioner assembly, one of the (very long) bolts holding it onto the block had engine oil on it. Had to be very careful not to get any on the belt or pulleys.
Are these holes used when casting the block or is there some other reason that the engine designers chose to have a bolt hole go right through to an oil gallery? |
||
|
|

|
|
|
#29 | ||
|
I'd rather be cycling
Join Date: Oct 2011
Location: in a house
Posts: 10
|
Well, my fix didn't last. The O-rings move along the shaft too much. Spoke to a mechanic friend who advised (as others have here) sealing with silicon after a jolly good clean of the excess oil. So far (about 3 weeks) there is no more leak.
@unko_sim - If the BA looks the same, then I would expect the fix will be the same. Mine's 400 miles away so I can't go and take a look, sorry. |
||
|
|

|
|
|
#30 | ||
|
Regular Member
Join Date: Aug 2007
Posts: 108
|
My old man just bought a AU S2 Wagon Dedicated Gas, it has the same problem as mine did, just a loose timing chain tensioner bolt, it needed about half a turn just to nip it up nothing to tight.. seems it has been leaking a while it was a mess and a half to clean up..
and the idler bearing at the top had packed it in.. which was spraying greese out by the look of it.. |
||
|
|

|