|
|
 |
|
|
|
Welcome to the Australian Ford Forums forum. You are currently viewing our boards as a guest which gives you limited access to view most discussions and inserts advertising. By joining our free community you will have access to post topics, communicate privately with other members, respond to polls, upload content and access many other special features without post based advertising banners. Registration is simple and absolutely free so please, join our community today! If you have any problems with the registration process or your account login, please contact us. Please Note: All new registrations go through a manual approval queue to keep spammers out. This is checked twice each day so there will be a delay before your registration is activated. |
|
|||||||
 |
|
|
Thread Tools | Display Modes |
|
|
#31 | |||
|
Donating Member
 Join Date: Aug 2006
Posts: 5,142
|
Quote:
 . I was dreading an intake manifold removal just to do a coilpack . I was dreading an intake manifold removal just to do a coilpack
|
|||
|
|

|
|
|
#32 | ||
|
FF.Com.Au Hardcore
Join Date: Jun 2005
Posts: 588
|
I have an AUIII Fairmont. I'm having a hell of a time trying to figure out how to remove the coil pack, without removing the inlet manifold? I removed the snorkel, air box and even the tubing up to the throttle body but it doesn't really seem to make any difference, because the coil pack is a fair bit further back. Going in from underneath the car, I can fit a 7mm socket onto each nut (just) but there's no room to lever a ratchet driver, for example on one the driver handle fouls on the heater tube and I can't even attach the driver to the socket. *May* be able to solve the fouling prob with a short extension but it's getting too dark to figure it out now. Either way, it's really cramped in there.
My main concern is that I'll be able to get the existing coil pack off, but won't be able to get the new one back on! I have big fumbly hands, and at the moment some badly scraped knuckles.  I have no idea what possessed ford to stick the coil pack hidden way down there, I'm assuming it's near the bottom of the engine so it doesn't overheat... |
||
|
|

|
|
|
#33 | |||
|
AU DIE HARD
  Join Date: Nov 2005
Location: Between 2nd and 5th gear
Posts: 5,073
|
A 7mm baby ring spanner or a ratchet drive set should do the job that assuming its a mini max set of sockets your using that you carn't get to with .. or failing that find a smart 10 year old with small hands

__________________
........Age and treachery will ALWAYS overcome youth and skill....... CORTINA 250 2V POWER soon to be AUXR8 Windsor pwrd .............WINDSOR WARLORD WHO CARRIES THE CLEVO MAFIA AND BROKEN BOSSES... .........................  ......................... .........................Quote:
|
|||
|
|

|
|
|
#34 | ||
|
FF.Com.Au Hardcore
Join Date: Jun 2005
Posts: 588
|
I just bought a different set that has a "straight down" screwdriver kind of thing, rather than a sideways ratchet. Will see how that goes tomorrow.
Didn't think of a mini ring spanner, d'oh! 
|
||
|
|

|
|
|
#35 | ||
|
FF.Com.Au Hardcore
Join Date: Jun 2005
Posts: 588
|
I think I can do the front two nuts with the mini ratchet + short extension.
With the rear one, I can get my "screwdriver" onto it but it's near impossible to grip. I can see it from the top of the engine bay and there's nothing blocking the path to it, so a suitable frankenstein mix of (long) extension bars and possibly adaptors should do the trick... which of course I don't have.  Time to reinstall the airbox & tubing AGAIN and go for a drive AGAIN to get more bits then wait AGAIN for the engine to cool. Time to reinstall the airbox & tubing AGAIN and go for a drive AGAIN to get more bits then wait AGAIN for the engine to cool.  Oh, it gets better. Father in law just called and needs his socket set back, so I have no way to remove the airbox now. Guess I'm leaving it for a few days because it will be raining tomorrow. What's gonna go wrong next? 
|
||
|
|

|
|
|
#36 | ||
|
Regular Member
Join Date: Feb 2011
Posts: 70
|
this thread really helped me when i chahged the coil pack and leads on my ef . the two back bolts i found were easiest got from the top thru the intake manifold with about 400mm of extension, having a telescopic magnet to place the bolts back in is a good idea as well.
|
||
|
|

|
|
|
#37 | ||
|
FF.Com.Au Hardcore
Join Date: Jun 2005
Posts: 588
|
I bought a set of funky thumbnail ratchets from bunnings today, they're about the size of a 50c piece. A bit like a normal ratchet driver, but with no lever to foul up on nearby tubes, manifolds etc. Very compact. When mated with a short extension (enough to clear the top of the right angle plugs) I think this will do the front two nuts, maybe even the back one too. I bought an adaptor too, just in case I do need to use a longer extension to reach up into the engine bay.
Funny thing is a few people have told me this is a 20-30 minute job. It's taken me two afternoons so far, including one trip to supercheap and two trips to bunnings, and I haven't even really started yet. 
|
||
|
|

|
|
|
#38 | ||
|
Regular Member
Join Date: Feb 2011
Posts: 70
|
probably a 20-30 min job when you do it the second time not the first time
|
||
|
|

|
|
|
#39 | ||
|
FF.Com.Au Hardcore
Join Date: Jun 2005
Posts: 588
|
YEAH! I finally got it done today! I think it's fixed the prob, my fuel consumption was between 15-17L/100km (this is a petrol I6!) and now after a 10km test drive it's back to about 13.5. Cost me about $255 all up for the leads (Bosch aftermarket) and coil pack (genuine).
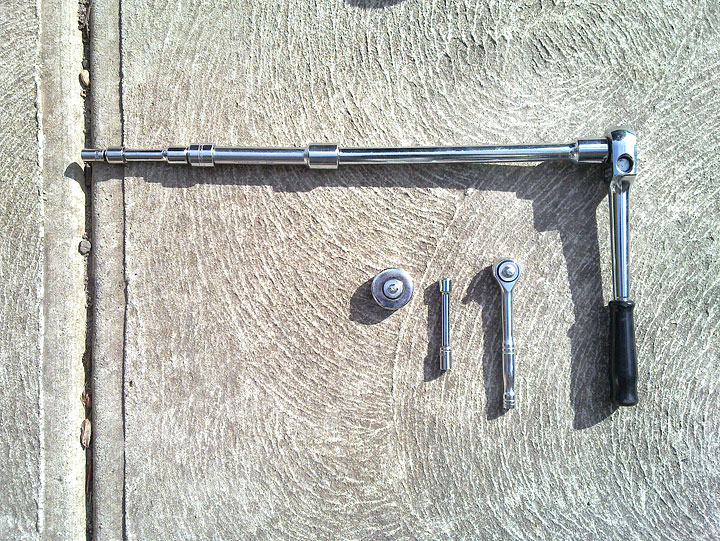
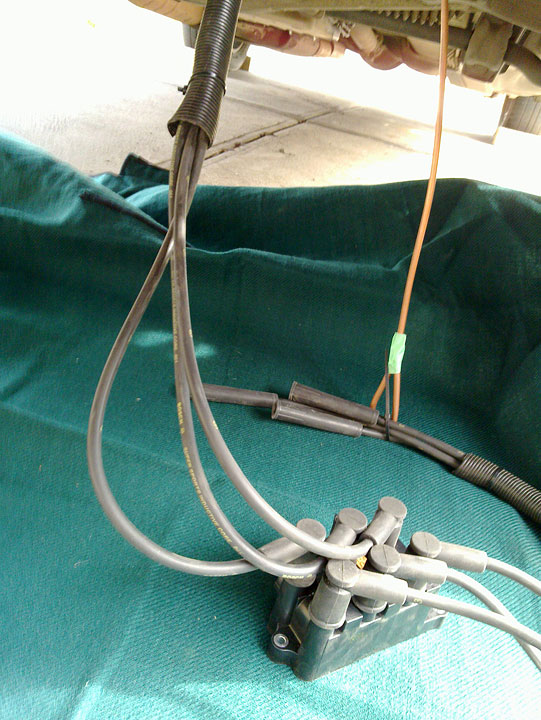
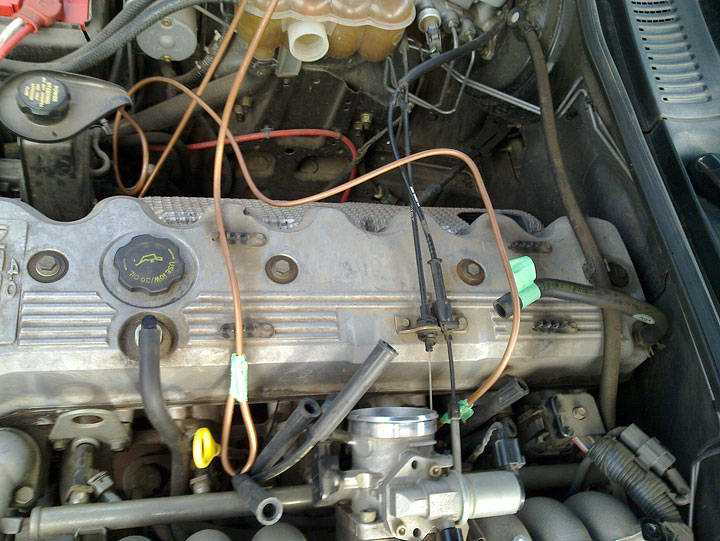
Here's some additional notes... *** Mark important things with tape or a sticker. I marked both the rubber hose removed from the inlet ducting, and the capacitor that attaches to the rear of the coil pack. If you forget these the engine will probably still run so it may not be obvious you've missed them. Also, remember where your two sets of leads go. On my car, the front set was to the right of the dipstick, the rear set was immediately behind the second throttle cable. I scribbled down words to that effect on a bit of paper in case I got confused on the way up.  Here's what I used to remove and reattach the coil pack bolts - a short extension with both lever and thumbwheel ratchets for the front two bolts, plus a bunch of extensions and adaptors for the rear bolt. Could probably do the rear bolt with just the small drivers but since I had all the bits it was easier going in from the top.  I assembled everything outside the car then pulled up the leads from underneath, rather than replacing the coil then doing the leads downwards. I had some spare copper tubing so I used this to help me feed the leads back up. It's rigid enough to hold its shape so you can keep things in position, but flexible enough to be able to curve it around corners. I fed everything from the front rather than the back. If the leads end up curling the wrong way around the lead for small sensor that's coming out of the side of the engine, you can momentarily unplug it (just a single spade connector)  Here's what it looks like from the top. I had to pull it up slightly from the top to clear the leads enough in order to be able to fit the coil pack onto its stand. You can also see where I've marked the black rubber tube to be reconnected. When replacing the coil pack, put the front two bolts in loosely (you can do this by feel) then line up and insert the rear bolt, pull it out slightly, enough to insert the spade for the capacitor, then work the bolt back down again. I finger tightened all 3 bolts (no need to look at them so just relax on your back for a bit  ), then started the engine just to make sure I'd reconnected everything, then put on the drivers/extensions/ratchets etc to fully tighten the bolts. ), then started the engine just to make sure I'd reconnected everything, then put on the drivers/extensions/ratchets etc to fully tighten the bolts.Summary: 1. Mark important bits, or write them down as a list. 2. Note the path the existing leads take. 3. Removing the coil pack and fitting the leads outside the car may be easier. (I was replacing my coil pack anyway) 4. Be careful working the leads back up, and don't rush. Do a bit from underneath then a bit from the top if necessary. 5. Confirm engine runs after sparks, leads and coil pack are electrically connected but before you've tightened bolts and replaced the inlet tubing. 6. Put your wedding ring back on. 
|
||
|
|

|
| 3 users like this post: |
|
|
#40 | ||
|
FF.Com.Au Hardcore
Join Date: Jun 2005
Posts: 588
|
Forgot to add: make sure the coil pack connections are good. Press the flat top of the plugs down hard to make sure they're seated properly. I did this when the pack and leads were out of the car, then another press by feel once they were installed into the car.
I checked the security cam and calculated that all up it took me about 90 mins, from getting out the ramps at the start to closing the bonnet at the end. Others could probably do it faster, but it was my first time, and I wasn't in any rush. 
|
||
|
|

|
|
|
#41 | ||
|
Flairs - Truckers Delight
Join Date: Aug 2006
Location: Brisbane Northside Likes: Opposite Lock
Posts: 5,731
|
rowan194, that is an excellent writeup.
__________________
Current: Silhouette Black 2007 SY Ford Territory TX RWD 7-seater "Black Banger"
2006-2016: Regency Red 2000 AUII Ford Falcon Forte Automatic Sedan Tickford LPG "Millennium Falcon" |
||
|
|

|
|
|
#42 | |||
|
FF.Com.Au Hardcore
Join Date: Jun 2005
Posts: 588
|
Quote:
 Hats off to Whoosha, I don't think I would have attempted it were it not for the photos and info in his OP. |
|||
|
|

|
|
|
#43 | ||
|
FF.Com.Au Hardcore
Join Date: Jun 2005
Posts: 588
|
Consumption back up to 15.5L/100km - guess it wasn't the ignition. :(
|
||
|
|

|
|
|
#44 | ||
|
Token American
Join Date: Aug 2011
Location: Brisbane QLD
Posts: 26
|
Generally speaking, I use dielectric grease on the boots on either end of the leads (for the spark plugs and coil pack/dizzy ends) on all of my vehicles. This prevents moisture getting at the contacts and causing corrosion. This helps with other pin type connections and has not done me wrong yet. I also firmly believe in that spray on battery connection protector glop as well.
Working on cars is part of my anger management...I always manage to get angry. ;) |
||
|
|

|
|
|
#45 | ||
|
Regular Member
Join Date: Jun 2007
Posts: 214
|
Hey guys, what are the best ignition leads to put in an AU2 XR6 (VCT)?
I did the coil, leads and plugs about 50,000km ago due to a bad miss under load. Fixed it straight up. Now the problem is back, I thought oh yeah must be time for plugs (just cheapys). Changed the plugs the other night and the miss is 10 times better, but still not completely gone, so Im thinking the leads must be gone again too.. Ive got a feeling I put Top Gun leads in it last time, just had a look under the bonnet and they are black with "FML - Premium Quality Silicon" written on them. Is there anything better? Thanks, Mark |
||
|
|

|
|
|
#46 | ||
|
Former BTIKD
 Join Date: Mar 2005
Location: Sunny Downtown Wagga Wagga. NSW.
Posts: 53,197
|
I've never had a problem with genuine leads.
__________________
Dying at your job is natures way of saying that you're in the wrong line of work.
|
||
|
|

|
|
|
#47 | ||
|
Falcon Unbelievable!
Join Date: Jul 2005
Location: Uncle Henry's Garage
Posts: 382
|
I had top gun 8mm for 110k's no issues at all, genuine coil pack for 220k,
now stupid ACA one it got replaced with has gone after 3months and to top it off they won't straight swap, I have to buy a new one first, then ACA test it and then I get my money back. Moral to the story: "don't buy stupid ACA Coils" Currently running Eagle leads with no issues from them |
||
|
|

|
|
|
#48 | ||
|
Starter Motor
Join Date: Dec 2005
Location: SOUTHERN NSW
Posts: 8
|
I'm sorry if this is a dumb question, but why does the coil pack have to be refitted in original position? Can it be placed in a more accessible one? Just a thought.
Cheers |
||
|
|

|
|
|
#49 | ||||
|
AU DIE HARD
  Join Date: Nov 2005
Location: Between 2nd and 5th gear
Posts: 5,073
|
Quote:
__________________
........Age and treachery will ALWAYS overcome youth and skill....... CORTINA 250 2V POWER soon to be AUXR8 Windsor pwrd .............WINDSOR WARLORD WHO CARRIES THE CLEVO MAFIA AND BROKEN BOSSES... .........................  ......................... .........................Quote:
|
||||
|
|

|
|
|
#50 | |||
|
Miami Pilot
 Join Date: Jan 2005
Location: ACT
Posts: 21,703
|
Quote:

__________________
-----------------------------------------------------------------
The Hammer: FG GTE | 376rwkw | 1/4 mile 11.793 @ 119.75mph 1.733 60' (4408lb) 1 of 60 FG MK1 335 GTEs (1 of 118 FG Mk 1 & 2 335 GTEs). Mods: Tune, HSD/ShockWorks, black GT335 19” staggered replicas with 245 & 275/35/19 Michelin Pilot sport 5s Daily: BF2 Fairmont Ghia I6 ZF, machine face GT335 19” staggered Replicas with 245s and 275s, Bilsteins & Kings FPV 335 build stats: <click here> Ford Performance Club ACT |
|||
|
|

|
|
|
#51 | ||
|
Starter Motor
Join Date: Dec 2005
Location: SOUTHERN NSW
Posts: 8
|
Exactly! Well done JC.
I stumbled over this thread trying to find a "how to" to replace my coil on my NL Fairlaine but mine has a dissy. I've got a feeling the process is much the same, but if you can point me in the right direction I'd appreciate it. Cheers |
||
|
|

|
|
|
#52 | ||
|
Starter Motor
Join Date: Jun 2011
Posts: 16
|
Thanks Whoosha. This is an old post still helping DIYers.
Our AU is on gas, thanks to Mr Howard and Mr Carpenter, it only cost the inspection fee of $37 over the pits. Changed the plugs a couple of years ago and put in iridiums. We've only done about 20,000kms on them and the engine began misfiring. When on gas, it was back-firing. Felt like it was blowing the exhaust off. Changed back to ordinary plugs, because the iridiums showed tracking marks down the ceramic. Went ok for a couple of weeks, then backfired again. I suspected coil pack, but thought computer might have a glitch, so got Ford to diagnostic($143). Coil pack was the only code that came up. Auto 1 had vdo unit for $107 with my club discount. Could have got on ebay for $66, but worth $40 to get it now. I'm about to use your guide. Thanks again for your efforts. Chris in Wanneroo, WA |
||
|
|

|
|
|
#53 | |||
|
Life begins at 40
 Join Date: Jan 2005
Location: Melbourne. Socialist capital of Victoriastan.
Posts: 3,715
|
Thank you Mr Whoosha and Rowan.
 I’ve just finished this job and your advice was most welcome. In fact, it saved me… 352 swear words.  45 swear words at a very loud volume.  7 new swear words that haven’t been invented yet.  And most of all, the neighbour’s kids learning and repeating 7 new swear words that haven’t been invented yet.  Cheers 
__________________
Quote:
Justice is what you get when you run out of money.
|
|||
|
|

|
|
|
#54 | |||
|
Starter Motor
Join Date: Dec 2012
Posts: 2
|
Quote:
I replaced my leads today, once I figured out the best method it was a breeze. No need to put the car up on ramps as I found it easy to work from the top once all the air filter intake stuff was removed. Very easy job as it turns out. Thanks Whoosha, without your tutorial I doubt I would have tried doing it myself. |
|||
|
|

|
| This user likes this post: |
|
|
#55 | ||
|
Starter Motor
Join Date: Feb 2013
Posts: 3
|
i have spent the last hour trying to figure this out - for some reason my au has more stuff in the engine bay than what's in the pics - i can do the rear bolt with an extension bar ( you can not get to it from underneath the vehicle at all ) but there is to much in the way for the front 2 , i can only get access to 1 of the front bolts from either top or bottom but the other one is not accessible at all , i can see it but you would need to be about a foot and a half in hight with tiny and bendable hands to reach it . To me it would make much more sense to place it on the other side of the engine - there isn't much there
this has to be able to be done , the car has 250k on it so it wont be the first coil pack to be replaced 9/01 auii SR sedan - from memory it has most of the options for this model , it does not have irs the picture of the coil pack and leads is not the same as mine |
||
|
|

|
|
|
#56 | ||
|
Regular Member
Join Date: Dec 2006
Posts: 62
|
qld ignition leads are NOT at Kallangur any more
the websites down but a guy gave me this number to try 32025700 my au2 has 182k on it and original leads (V8) heading to bursuns to buy some NGK leads $275 :( |
||
|
|

|
|
|
#57 | ||
|
Starter Motor
Join Date: Jun 2013
Posts: 3
|
thank you for this post helped me very much on how to change the coil pack still had to use a few nast word to call the car with the tight fit getting the coil pack back in place but made a huge diffrance i cant see what the car ramps are in need for as i did everything from the top with ease unforantly i still have a miss and think its due to a second hand coil pack as i couldent get one any where in my area with out waiting a few days but plugs and leads are done so just need to redo coil pack again lol
|
||
|
|

|
|
|
#58 | ||
|
Regular Member
Join Date: Jun 2010
Posts: 79
|
What would be the symptoms of coil pack and or spark plugs failing on the AU3 Futura? I am getting stuttering under acceleration.
|
||
|
|

|
|
|
#59 | ||||
|
AU DIE HARD
  Join Date: Nov 2005
Location: Between 2nd and 5th gear
Posts: 5,073
|
Quote:

__________________
........Age and treachery will ALWAYS overcome youth and skill....... CORTINA 250 2V POWER soon to be AUXR8 Windsor pwrd .............WINDSOR WARLORD WHO CARRIES THE CLEVO MAFIA AND BROKEN BOSSES... .........................  ......................... .........................Quote:
|
||||
|
|

|
|
|
#60 | ||
|
Starter Motor
Join Date: Jul 2014
Posts: 2
|
thanks did the job...
|
||
|
|

|
 |
| Thread Tools | |
| Display Modes | |
|
|