
|
|

|
|
|
|
Welcome to the Australian Ford Forums forum. You are currently viewing our boards as a guest which gives you limited access to view most discussions and inserts advertising. By joining our free community you will have access to post topics, communicate privately with other members, respond to polls, upload content and access many other special features without post based advertising banners. Registration is simple and absolutely free so please, join our community today! If you have any problems with the registration process or your account login, please contact us. Please Note: All new registrations go through a manual approval queue to keep spammers out. This is checked twice each day so there will be a delay before your registration is activated. |
|
|||||||
 |
|
|
Thread Tools | Display Modes |
 10-03-2008, 11:30 PM
|
#1 | ||
|
On 'L' Plates
Join Date: Jan 2008
Location: Thornlie Western Australia
Posts: 18
|
ok so i cant take the credit for the inspiration here. However i though i would show you just how easy it is to fit Fogs to your WQ.
This was the inspiration thread. http://www.fordforums.com.au/showthread.php?t=11206059 but without pics i felt i was jumping in the deep end. However i went ahead with the help from chinw3e and my local USELESS ford spare parts dealer. Now honestly dealing with the local ford dealer was like pulling teeth. Even though courtesy of chinw3e i had most of the part numbers i needed. First things first. Parts list Fogs. i got mine from Ebay...???? why i hear you ask ... well Ford wanted $145 Each for them.... NO WAY... Anyhoo after some searching i found this store http://stores.ebay.com.au/UltimateStyling and picked up a pair for 40 Pound Delivered to AU. About $100 Much cheaper.  Hallogen Globes got mine from the Local Auto-pro "H11" (i think check your manual) $70au the pair  The Bezels. (the plastic surround that replace the pain vented one onthe car) Genuine Ford Part 6S61 19952BC55MW and 6S61 19953BC55MW One is the left the other is the right. (Cant remember which code was which)  Clips Genuine Ford Part. W 700895 S300 you need four of these all the same part number. YOu could rig something up to not use these but it make the job much simpler if you get these clips. They are kind of like wall plugs for a square hole. $13AU for 4. Plus some screws 10g is the size i used not from ford but some generic black ones from Auto-pro [ing]http://lh3.google.com/Rimwar/R9UReWH8zhI/AAAAAAAAAQg/jt7SZkvLLI8/s400/Image084.jpg[/img] Next the Actuall light switch from the Dash ... you need the one with both front and rear fog light positions. Genuine Ford part. $135 The part number i got from ford differed from the one Chinw3e provided i dont think he was wrong it just depended on if they took the number from the Ghia or the Zetec part listing. Chinw3e number was:6S6T 13Z024 DA My Sourced part number was:  OK thats it for Parts. The only tool you need is a phillips head screwdriver. Onto the how to..... Starting with the switch. First on the Right hand side of the stearing wheel there is a little Coin/Sunglasses Glovebox. Open this up and where the box hinges it will pull directly up then slide down to alow you to completely remove this box.  This will allow you to reach into the Dash and up behind the light switch controll. There are two plastic spring clips holding this switch into the dash one on top of the switch and one on the bottom. They are the width of the switch and you should be able to squeeze them in and slide the switch out of the dash. In the pic you can make out the spring.  So now just pull it out the dash and let it Hang.  Disconect the plug on the back of the switch and plug in the new one. The Plug only goes in one way Completely Noob proof. here is a pic showing the new switch next the the old one.  there is hardly any difference here the bottom one has the extra pull out position for the front and rear lights. there is hardly any difference here the bottom one has the extra pull out position for the front and rear lights.Ok plug everything back in and your done on the interior. |
||

|

|
|
10-03-2008, 11:31 PM
|
#2 | ||
|
On 'L' Plates
Join Date: Jan 2008
Location: Thornlie Western Australia
Posts: 18
|
Sorry part two had to post part one incomplete as the battery on my laptop was failing.
::::Continue::::::: |
||
|
|
|
|
11-03-2008, 12:04 AM
|
#3 | ||
|
On 'L' Plates
Join Date: Jan 2008
Location: Thornlie Western Australia
Posts: 18
|
Sorry part two had to post part one incomplete as the battery on my laptop was failing.
::::Continue::::::: Before shot of the LX Pre-Fog 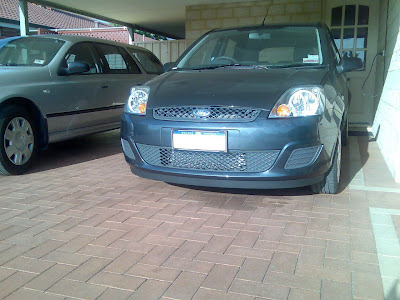 Now to remove the existing front bezels just put your hand up behind the bumper and you will feel the plastic clips holding in the bezel push the clips forward and the bezel will just pop out. Very simple.. You can prize it from the front but i didnt want to take a screwdriver to the bumper. (to much chance to scratch it)   You will see with the bezel removed the fog light clip attached to a blanker that is affixed to the bumper. There is a locking spring clip on this to remove it from the blanker. unclip it and have a look this is where the H11 lights directly connect.   Next the clips that slot into the Square holesl. Slide these into position in preperation to take the fogs. 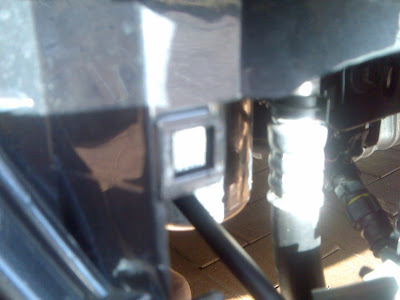 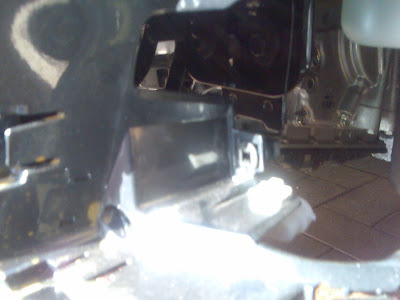  Now the fogs themselves plug the globes into the fog housings. they will only go in one way and the clip will end up facing downwards.  you can see the adjustment screw in this pic. The adjuster on the right hand side of this pic.. Once fitted it will allow you to adjust the lights up and down so they dont shine too high or too low. you can see the adjustment screw in this pic. The adjuster on the right hand side of this pic.. Once fitted it will allow you to adjust the lights up and down so they dont shine too high or too low.pic of the lamp connected to the Wiring loom on the car. 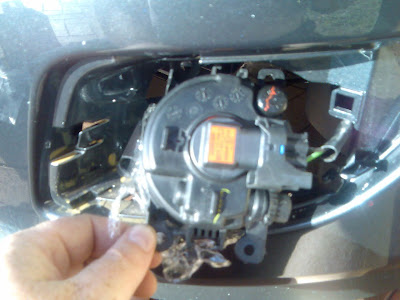 Now just screw your 10g screws into the Clips on the bumper and they are in. Its jus a mater of refiting your new bezels to your bumper. ( i didnt take a shot of this ... about the only thing i didnt take) Any how you get the idea. Replacing the New fog Bezels.  & &  Now the slip back in from the centre of the car to the outside wheel. Just dont push too hard... they will find the groove and just slip in with a click. Finished fog up close   Overall finished product. 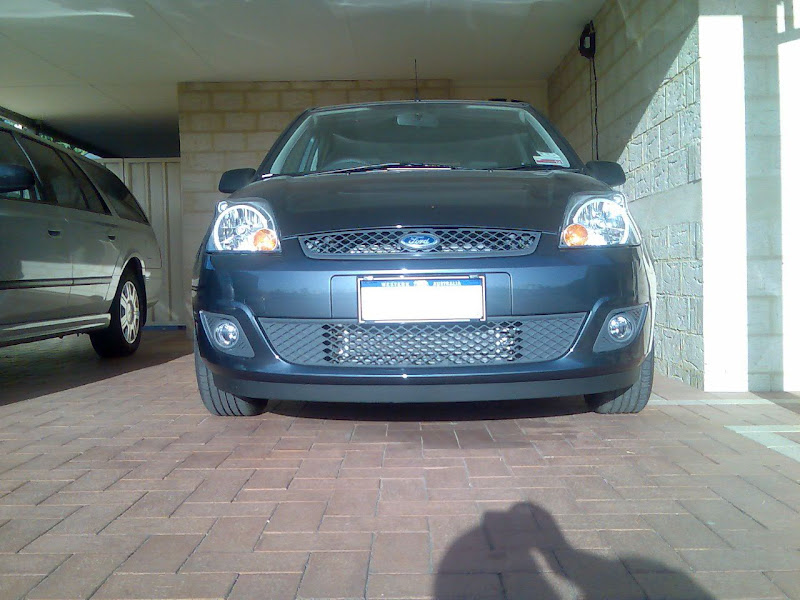 Ok so now i got some left overs.... The old Light switch and the Std inserts. Any Takers PM me.  If your on dial up sorry about the hundred of pics.....Most will apreciate. |
||
|
|
|
|
11-03-2008, 12:26 AM
|
#4 | ||
|
FF.Com.Au Hardcore

Join Date: Dec 2004
Location: Adelaide
Posts: 3,103
|
Good write up!
Hmmmm, I see that site has fog lights for the LS Focus......
__________________
Current Rides: 2012 KK Jeep Cherokee Limited CRD - Still going strong 2019 MG ZS Essence 1988 RD Mitsubishi Colt GL - 59kW of Fury 2022 Kia Stinger GT |
||
|
|
|
|
11-03-2008, 07:11 PM
|
#5 | |||
|
EuroFordClub

Join Date: Oct 2007
Location: SE Melbourne
Posts: 727
|
Quote:
 After seeing this I might give it a go in my LT focus. Can't be too much more complicated. I'm just hoping the wiring is snuggly fitted inside my bumper like it was in your car. Very nice mate, looks the goods
__________________
'08 Black Ford Focus LT CL Hatch
Far from stock... --- SOLD  : : Now riding a 2009 Kawasaki Ninja 250R  : : |
|||
|
|
|
|
12-03-2008, 01:46 PM
|
#6 | ||
|
On 'L' Plates
Join Date: Jan 2008
Location: Thornlie Western Australia
Posts: 18
|
I hate this forum for editing after X amount of time you can no longer correct any of your errors. This pic was missing from above due to a typo, which i can no longer correct.
Clips Genuine Ford Part. W 700895 S300 you need four of these all the same part number. YOu could rig something up to not use these but it make the job much simpler if you get these clips. They are kind of like wall plugs for a square hole. $13AU for 4. Plus some screws 10g is the size i used not from ford but some generic black ones from Auto-pro 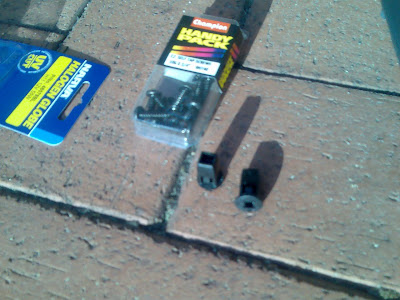 These black clips are essential to fitting the fogs so dont forget them. And my Auto pro didnt have anything sized even close. |
||
|
|
|


 Linear Mode
