
|
|

|
|
|
|
Welcome to the Australian Ford Forums forum. You are currently viewing our boards as a guest which gives you limited access to view most discussions and inserts advertising. By joining our free community you will have access to post topics, communicate privately with other members, respond to polls, upload content and access many other special features without post based advertising banners. Registration is simple and absolutely free so please, join our community today! If you have any problems with the registration process or your account login, please contact us. Please Note: All new registrations go through a manual approval queue to keep spammers out. This is checked twice each day so there will be a delay before your registration is activated. |
|
|||||||
 |
|
|
Thread Tools | Display Modes |
 12-04-2008, 10:48 PM
|
#1 | ||
|
Regular Member

Join Date: Aug 2007
Location: Parramatta, SYD
Posts: 378
|
hi guys,
can you just change one wheel stud or do you have to get a new hub?
__________________
Many Thanks 2001 AUII Factory LPG Manual XL Styleside Box High series bonnet Clear Side Indicator K&N Air Filter BAXR6T Snorkle Low Fronts, Super Low Leafs |
||

|

|
|
13-04-2008, 12:32 AM
|
#2 | ||
|
Miami Pilot
 
Join Date: Jan 2005
Location: ACT
Posts: 21,703

|
You can just change one wheel stud. They will knock out with a hammer, and then use a long socket and wheel nut to pull the new one in nice and tight. Although, changing wheel studs on an IRS rear is a PITA!
__________________
-----------------------------------------------------------------
The Hammer: FG GTE | 376rwkw | 1/4 mile 11.793 @ 119.75mph 1.733 60' (4408lb) 1 of 60 FG MK1 335 GTEs (1 of 118 FG Mk 1 & 2 335 GTEs). Mods: Tune, HSD/ShockWorks, black GT335 19 staggered replicas with 245 & 275/35/19 Michelin Pilot sport 5s Daily: BF2 Fairmont Ghia I6 ZF, machine face GT335 19 staggered Replicas with 245s and 275s, Bilsteins & Kings FPV 335 build stats: <click here> Ford Performance Club ACT |
||
|
|
|
|
13-04-2008, 08:21 AM
|
#3 | ||
|
Regular Member
Join Date: Aug 2007
Location: Parramatta, SYD
Posts: 378
|
thanks a lot jc. can u get the stud from ford?
__________________
Many Thanks 2001 AUII Factory LPG Manual XL Styleside Box High series bonnet Clear Side Indicator K&N Air Filter BAXR6T Snorkle Low Fronts, Super Low Leafs |
||
|
|
|
|
13-04-2008, 10:36 AM
|
#4 | |||
|
I miss my wheelbarrow
 
Join Date: Jan 2005
Location: Bluestreak Performance
Posts: 11,500
 
|
Quote:
As JC says, they are a PITA Daniel |
|||
|
|
|
|
13-04-2008, 08:03 PM
|
#5 | |||
|
Miami Pilot
Join Date: Jan 2005
Location: ACT
Posts: 21,703
|
Quote:
But they're less than $10 from Ford, and I think even Repco etc carry them too.
__________________
-----------------------------------------------------------------
The Hammer: FG GTE | 376rwkw | 1/4 mile 11.793 @ 119.75mph 1.733 60' (4408lb) 1 of 60 FG MK1 335 GTEs (1 of 118 FG Mk 1 & 2 335 GTEs). Mods: Tune, HSD/ShockWorks, black GT335 19 staggered replicas with 245 & 275/35/19 Michelin Pilot sport 5s Daily: BF2 Fairmont Ghia I6 ZF, machine face GT335 19 staggered Replicas with 245s and 275s, Bilsteins & Kings FPV 335 build stats: <click here> Ford Performance Club ACT |
|||
|
|
|
|
13-04-2008, 10:25 PM
|
#6 | ||
|
Regular Member
Join Date: Aug 2007
Location: Parramatta, SYD
Posts: 378
|
do you have to take the brake disk out to take the stud off?
__________________
Many Thanks 2001 AUII Factory LPG Manual XL Styleside Box High series bonnet Clear Side Indicator K&N Air Filter BAXR6T Snorkle Low Fronts, Super Low Leafs |
||
|
|
|
|
14-04-2008, 12:32 AM
|
#7 | |||
|
Miami Pilot
Join Date: Jan 2005
Location: ACT
Posts: 21,703
|
Quote:
__________________
-----------------------------------------------------------------
The Hammer: FG GTE | 376rwkw | 1/4 mile 11.793 @ 119.75mph 1.733 60' (4408lb) 1 of 60 FG MK1 335 GTEs (1 of 118 FG Mk 1 & 2 335 GTEs). Mods: Tune, HSD/ShockWorks, black GT335 19 staggered replicas with 245 & 275/35/19 Michelin Pilot sport 5s Daily: BF2 Fairmont Ghia I6 ZF, machine face GT335 19 staggered Replicas with 245s and 275s, Bilsteins & Kings FPV 335 build stats: <click here> Ford Performance Club ACT |
|||
|
|
|
|
14-04-2008, 08:58 AM
|
#8 | ||
|
Regular Member
Join Date: Aug 2007
Location: Parramatta, SYD
Posts: 378
|
yes it is the front. so just hammer it out then use a nut to pull the new one in?
__________________
Many Thanks 2001 AUII Factory LPG Manual XL Styleside Box High series bonnet Clear Side Indicator K&N Air Filter BAXR6T Snorkle Low Fronts, Super Low Leafs |
||
|
|
|
|
14-04-2008, 01:05 PM
|
#9 | |||
|
Miami Pilot
Join Date: Jan 2005
Location: ACT
Posts: 21,703
|
Quote:
I'm pretty sure there is a write up floating around about how to replace the front hubs - worth looking at, and don't worry; it's not as hard as you think it might be (even I managed to do it following the instructions written up by ronwest). I'll see if I can find the link to it for you. No link, just the entire method! HOW TO REPLACE FRONT HUB AND/OR DISC (ROTOR) FORD AU NU DU BA BF INTRODUCTION As the front hub is the same for all the models referenced above, the replacement procedure will be similar. There may be some small differences between the models of which Im not aware. My apologies if this How To is not fully representative of the procedure for your vehicle. I have written this How To with the novice car DIYer in mind. Again, apologies to those more advanced car DIYers for the simple tone but hopefully there may also be something of value in here for you. The following front hub and rotor replacement was performed on an AU Series III Fairmont Ghia. WHAT IS A FRONT HUB? A front hub is the carrier for the wheel bearing and is the location for mounting the brake disc and the road wheel. The front hub relevant to this How To has a non-replaceable inner and outer wheel bearing i.e. the hub and wheel bearings are an integrated unit. WHY REPLACE THE FRONT HUB? Typically the front hub will be replaced if the wheel bearing is diagnosed as faulty. Other reasons for replacing the front hub may include physical damage (accident etc), vehicle submersion (e.g. flooded creek), or, as a scheduled preventative maintenance measure. HOW DO I DIAGNOSE A POSSIBLE FAULTY FRONT WHEEL BEARING? Usually the first sign of a faulty wheel bearing is a non-specific drone or hum or rumble heard when driving the vehicle. Other noises such as a squeak or chirp or squeal or moan are also regularly mentioned as indicative of the noise associated with a failing wheel bearing. A grinding noise when turning may be another symptom. Less usual symptoms are steering wander and/or pulling to one side under braking. Wheel bearing noise is quite often wrongly thought to be differential noise. The main difference is that wheel bearing noise is usually proportional to vehicle speed and will not change with acceleration, coasting, or deceleration. Wheel bearing noise may change its pitch or tone, or may at certain speeds disappear altogether. If the direction of the noise from the suspect front wheel bearing (drivers side or passengers side) cannot be determined from within the vehicle there are a few extra checks that may be carried out. An analysis whilst the car is moving can sometimes be made by turning the car to right and then the left. If the noise is worse whilst turning in one direction the opposite side wheel bearing may be indicated as suspect e.g. if when turning left the noise is louder than when turning right, the right wheel bearing is indicated. For static testing the car should be jacked up, supported on jack stands, and each front wheel in turn spun to ascertain if any rumbling noise can be detected from the wheel bearings. Another test whilst the car is jacked up is to grasp the tyre at the 12 oclock and six oclock positions and rock in and out to detect any movement from the wheel bearings. Once you have detected the failing wheel bearing you are faced with a choice to replace one hub or both? If there is no apparent reason for the wheel bearing failure and the vehicle has travelled reasonable kms since the last front hub replacement, it is worth considering replacing both hubs at the same time. Obviously, if one set of wheel bearings has ended its useful life the other side may also be not far away from failure. Ok, enough preamble, to the task at hand . PARTS LIST:- Front Hub AU2 2B663A 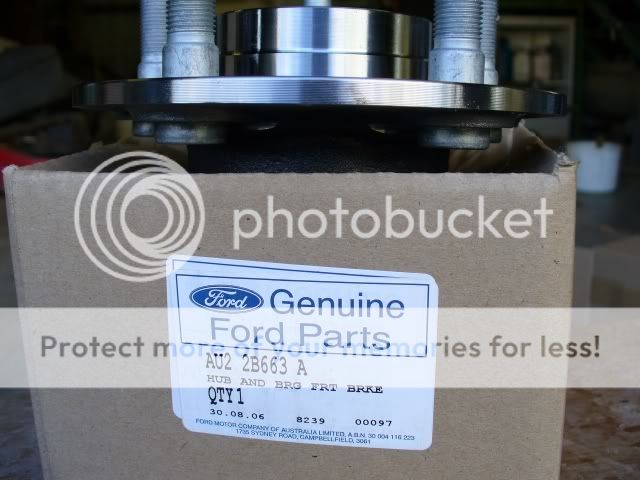 RDA Slotted Rotors RDA502S (same part # for Left and Right) 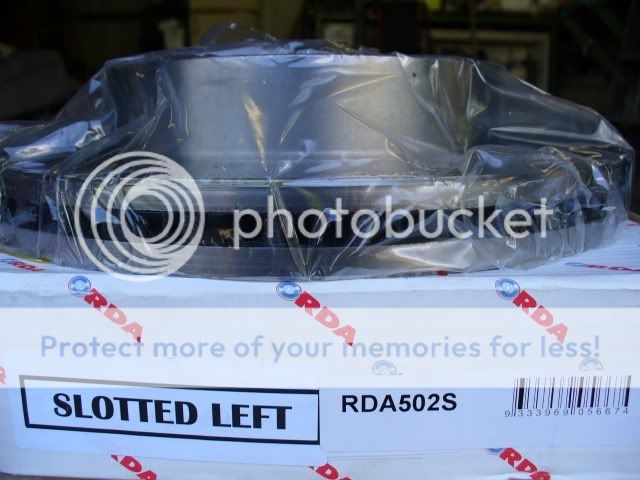 TOOLS LIST:- (Tools listed with ** are necessary) ** 15mm ring spanner/socket Rubber hammer ** Large multigrips ** 1 3/8 (36mm) ring spanner/socket Puller Masking tape ** WD40 (or similar) ** Cold chisel ** Hammer Emery cloth ** Wire brush ** Prepsol (or similar) ** Loctite (or similar) Permatex (or similar) ** Tension Wrench (capable of 305nm 225lbs/ft) ** Grease 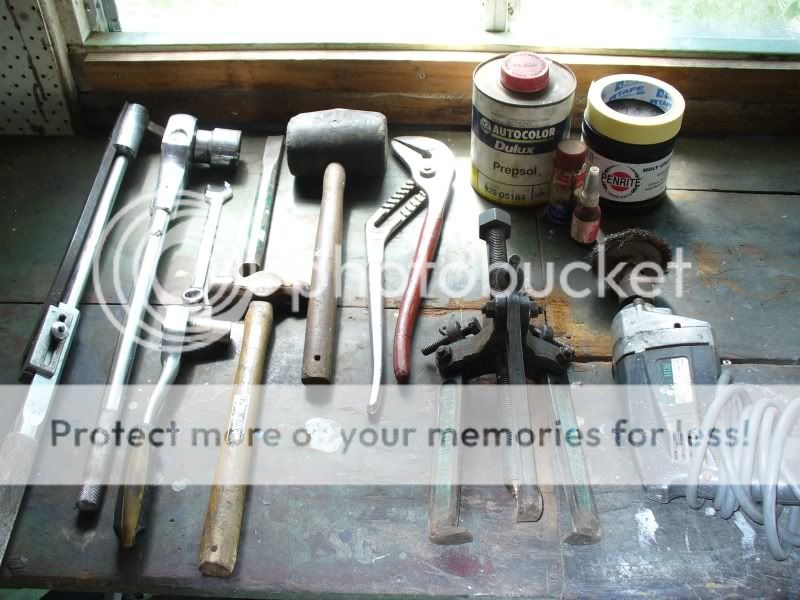 PROCEDURE:- 1. The assumption is made that you have safely and securely jacked up the car so that one or both front wheels are clear of the ground (if replacing one hub/rotor you may choose to jack up just that wheel). 2. Remove road wheel 3. Using 15mm spanner/socket undo brake caliper bolts located at rear and hang caliper from coil spring with wire. Do not allow caliper to hang from the flexible brake line 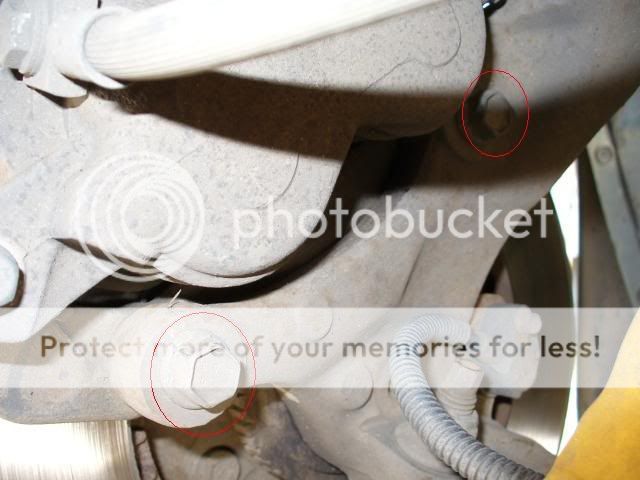 4. Loosen disc on wheel studs by using rubber hammer to tap disc from behind and remove disc from hub 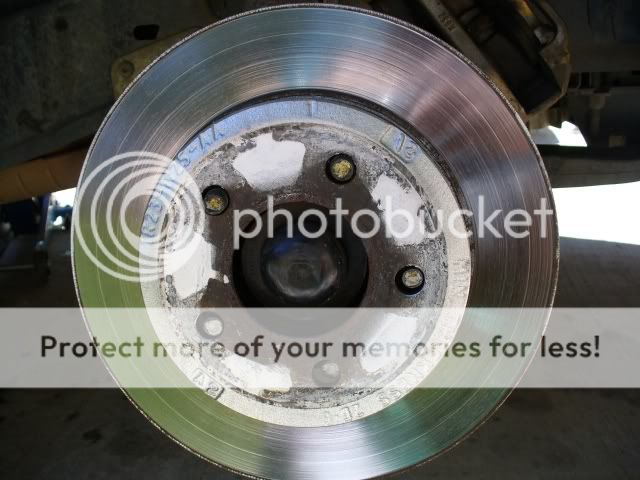 If you are replacing rotors only, go to Point 15 5. Bare hub including dust cover is now visible remove cover with multigrips 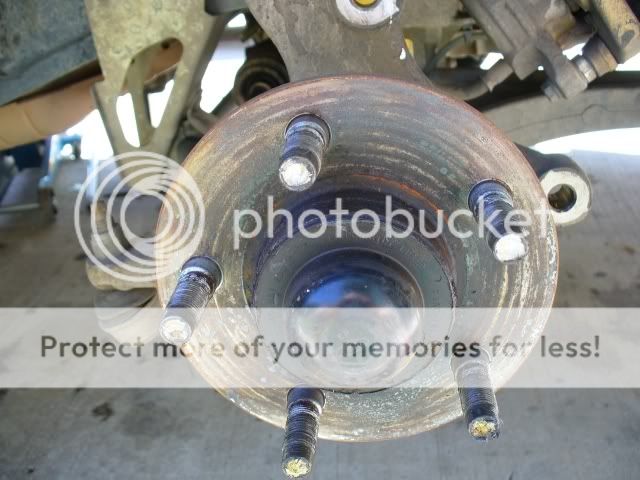 6. Be very careful not to damage the ABS sensor or pulse ring. 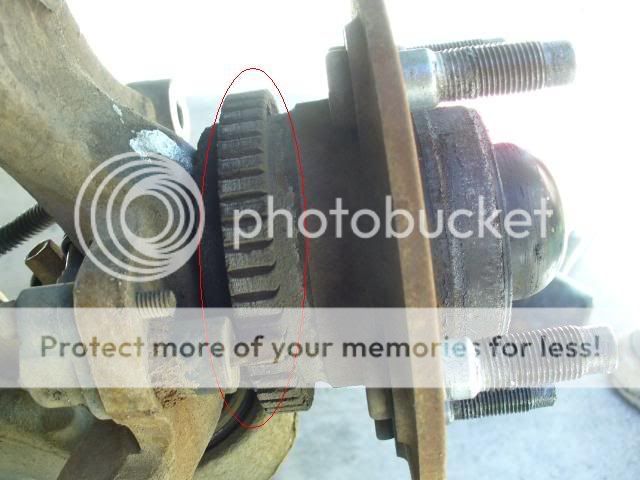 7. Remove hub nut with 1 3/8 (36mm) socket 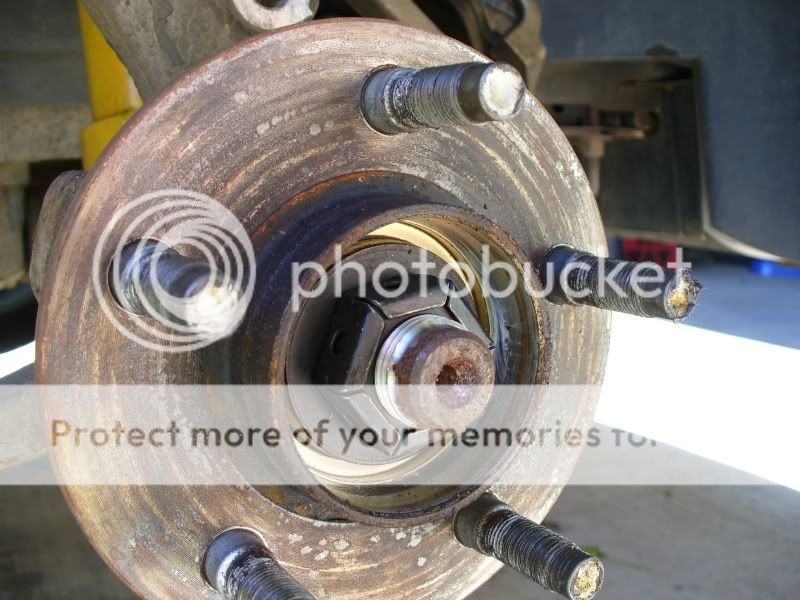 8. Remove hub with puller 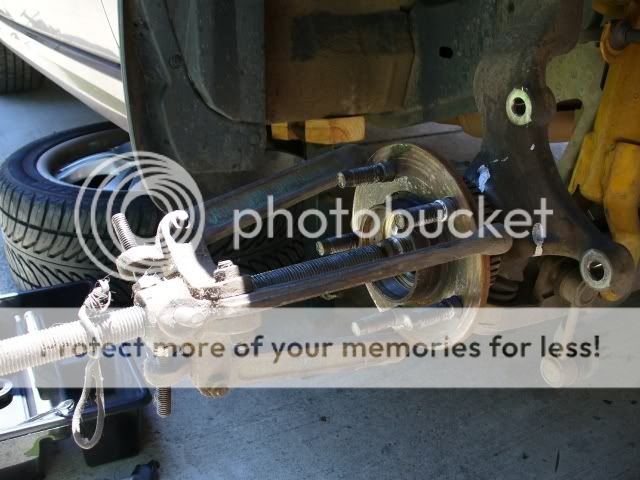 Note evidence of water intrusion into bearing area bearing inner ring is missing - still on shaft 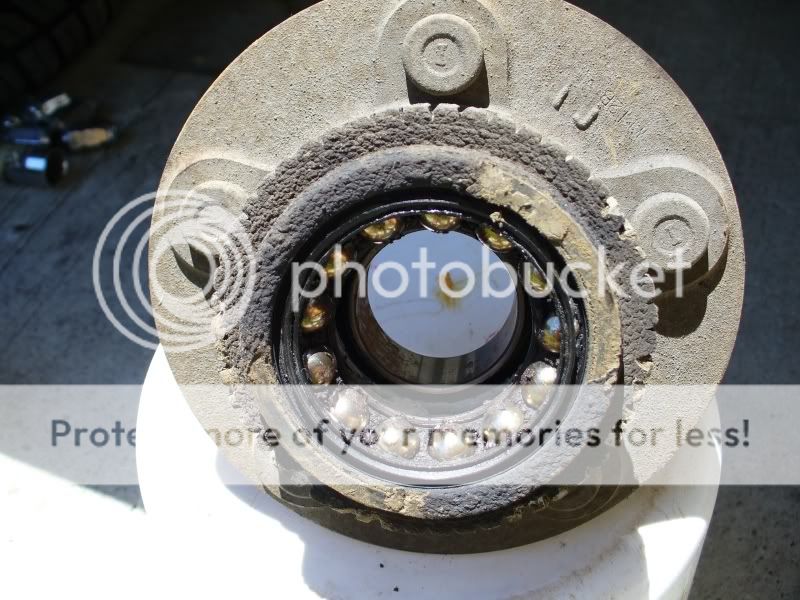 Shaft with hub removed but bearing inner ring remains rusted to shaft 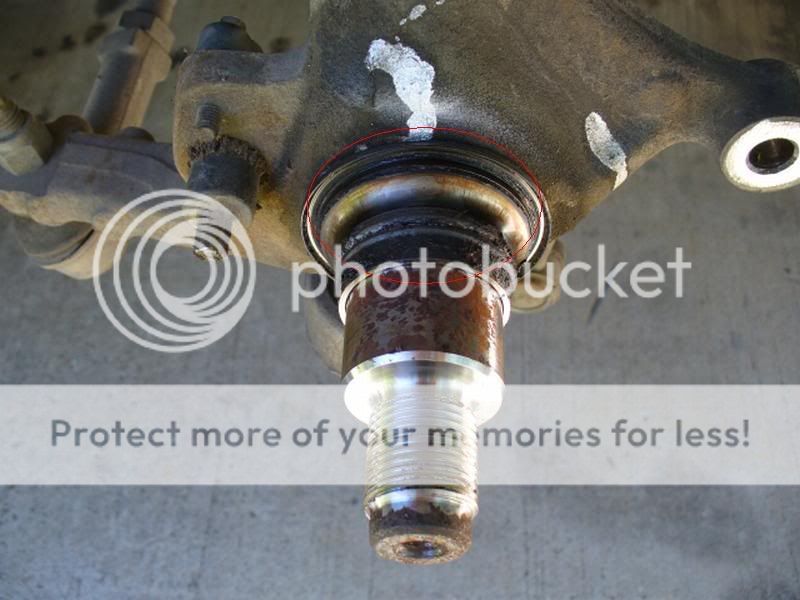 9. Protect shaft thread with masking tape and clean rust from shaft using emery cloth and/or wire brush  10. After cleaning exposed area of shaft, spray WD40 or similar between inner ring and shaft. Have a cup of coffee to allow time for WD40 to penetrate under the inner ring. 11. Using a cold chisel on the raised section of the inner ring, gently tap chisel until inner ring is dislodged from its position and removed from shaft. NOTE:- inner ring is a slide fit onto shaft. It is NOT an interference fit so relatively little effort should be required to remove it.  12. Use emery cloth and wire brush (I used a rotary wire brush) to fully clean the shaft, thread and ABS sensor. 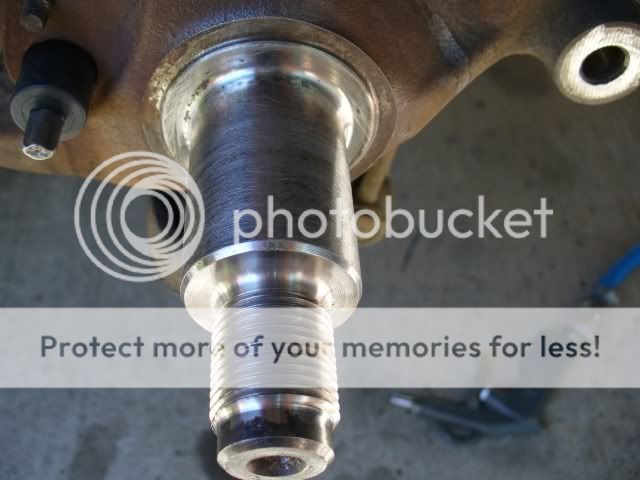 13. Install new hub by sliding onto shaft. Apply Loctite or similar to thread and tighten hub nut with tension wrench to 305Nm (225 lbs ft) 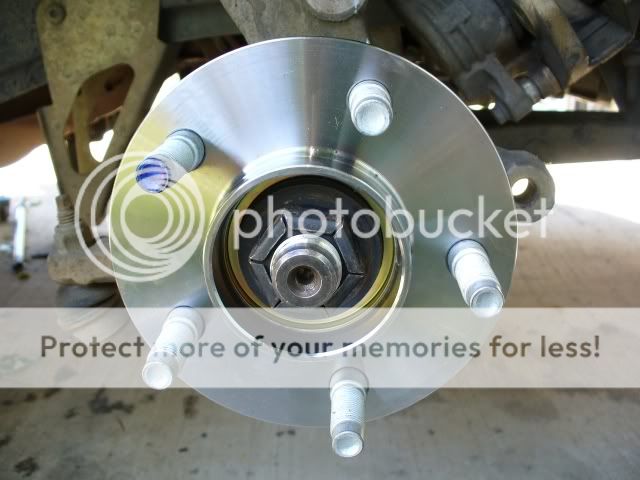 14. Smear a light coat of Permatex or similar on lip of dust cover and install (will assist to impede water ingress). Using Prepsol or similar remove the protective oily coating from disc (I took the opportunity to paint the relevant exposed portion of disc prior to installation). 15. Place disc over hub and seat home on wheel studs. (I used two oversized nuts + wheel nuts to hold disc in place while I located and tightened the brake caliper this is not strictly necessary but does make it easier to locate and prevent cross-threading of caliper bolts). 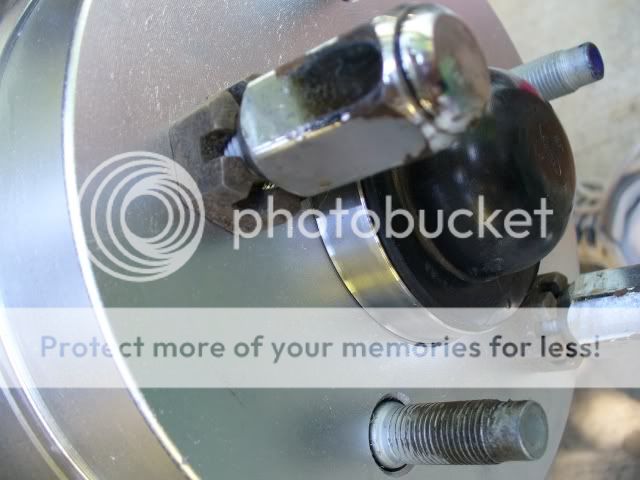 16. Install disc pads into caliper ensuring that pad shims are correctly located. It may be necessary to compress the piston(s) into the bore(s) using a large multigrips or G clamp or similar. 17. Install brake caliper with 15mm ring spanner/socket using the two (cleaned) bolts with Loctite on thread. Tension to 30Nm. (I took the opportunity to paint the caliper while disc was removed). 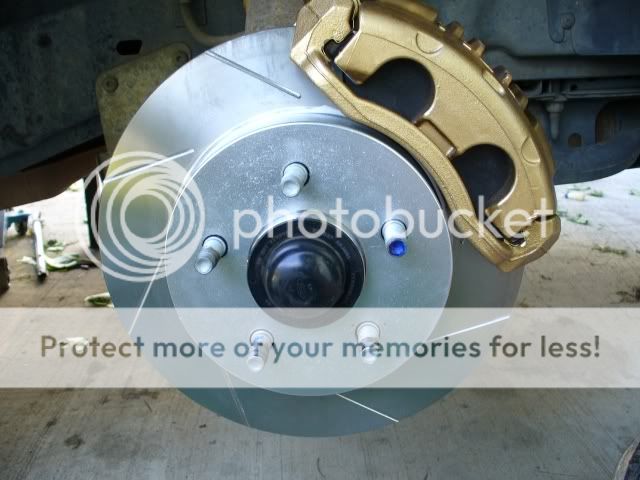 18. Smear the wheel studs with a little grease or (anti-seize), mount the road wheel and stand back and admire your handywork ;) 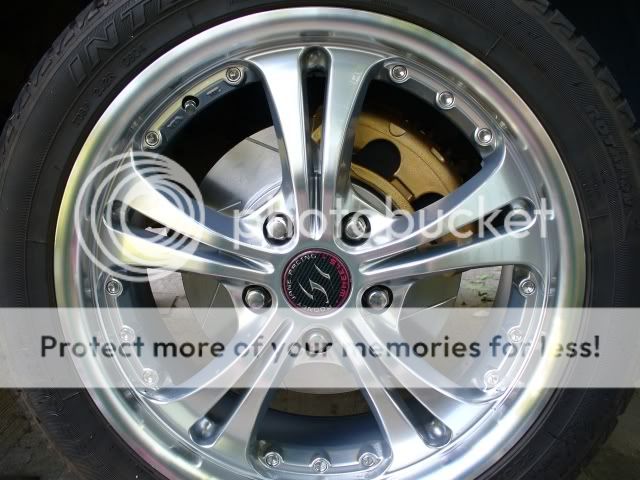 COMMENTS :- The procedure outlined above was performed on the drivers side front hub. I replaced both front hubs (and rotors) and note that the passengers side hub did NOT require a puller to remove from shaft. There was no evidence of water intrusion and the hub was quite easily removed by hand. (As it appears to be in good condition Ill keep it as an emergency spare). The passengers side shaft was also much easier to clean a wipe with a Prepsol dampened cloth was all that was required. Obviously the list of required tools will be reduced if the hub easily slides off the shaft. Regarding time to complete the job, I would estimate that the difficult to remove hub would take 90 minutes from start to finish. The easy to remove hub would take around 45 minutes from start to finish. A final note regarding the tightening of the hub nut:- in my opinion the use of a tension wrench set correctly to tighten the hub nut is a critical component of a successful hub replacement. As mentioned previously, the hub is only a slide fit onto the shaft (this means it is a loose fit). If the hub nut is too tight the wheel bearings may deform and shorten the life of the component. You can guess the shortcomings of a hub nut that is too loose . All in all, an easy job to complete
__________________
-----------------------------------------------------------------
The Hammer: FG GTE | 376rwkw | 1/4 mile 11.793 @ 119.75mph 1.733 60' (4408lb) 1 of 60 FG MK1 335 GTEs (1 of 118 FG Mk 1 & 2 335 GTEs). Mods: Tune, HSD/ShockWorks, black GT335 19 staggered replicas with 245 & 275/35/19 Michelin Pilot sport 5s Daily: BF2 Fairmont Ghia I6 ZF, machine face GT335 19 staggered Replicas with 245s and 275s, Bilsteins & Kings FPV 335 build stats: <click here> Ford Performance Club ACT Last edited by JC; 14-04-2008 at 01:15 PM. |
|||
|
|
|
|
14-04-2008, 03:31 PM
|
#10 | ||
|
Regular Member
Join Date: Aug 2007
Location: Parramatta, SYD
Posts: 378
|
the thing is when i tried to paint my brakes awhile ago i couldnt take the bolts off my caliper so i dont think i can do it...
__________________
Many Thanks 2001 AUII Factory LPG Manual XL Styleside Box High series bonnet Clear Side Indicator K&N Air Filter BAXR6T Snorkle Low Fronts, Super Low Leafs |
||
|
|
|
|
14-04-2008, 03:52 PM
|
#11 | |||
|
Miami Pilot
Join Date: Jan 2005
Location: ACT
Posts: 21,703
|
Quote:
Use a 15mm ring spanner, and a hammer to get the bolts undone initially (clockwise = undo, CCW = do up), then they should come off easy (they're loctited on, hence why they are so hard).
__________________
-----------------------------------------------------------------
The Hammer: FG GTE | 376rwkw | 1/4 mile 11.793 @ 119.75mph 1.733 60' (4408lb) 1 of 60 FG MK1 335 GTEs (1 of 118 FG Mk 1 & 2 335 GTEs). Mods: Tune, HSD/ShockWorks, black GT335 19 staggered replicas with 245 & 275/35/19 Michelin Pilot sport 5s Daily: BF2 Fairmont Ghia I6 ZF, machine face GT335 19 staggered Replicas with 245s and 275s, Bilsteins & Kings FPV 335 build stats: <click here> Ford Performance Club ACT |
|||
|
|
|


 Linear Mode
